
TL;DR:
- A well-organized trip itinerary balances fixed commitments with flexible activities to maximize travel enjoyment and adaptability. It starts with defining trip purpose, length, and three key experiences, then builds around fixed points, preferred activities, and backups arranged geographically. Testing all documents offline before travel ensures smooth connectivity at remote or busy border crossings, reducing stress during the trip.
A well-organized trip itinerary is a structured, flexible plan that balances fixed commitments with adaptable daily activities to maximize your travel enjoyment. Most travelers either over-plan every hour or wing it entirely, and both approaches cost time and money. The real skill in organizing travel plans sits between those extremes: building a framework that holds up when flights are delayed, neighborhoods surprise you, or a local recommends something better. This article walks you through how to organize trip itineraries step by step, from gathering information to validating your plan before departure, using tools like Google Maps, TripIt, and simple spreadsheet templates.
How to organize trip itineraries: the core framework
Organizing a trip itinerary starts with three decisions made before you touch a calendar: your trip purpose, your total length, and your three non-negotiable experiences. Start with these three anchors before planning transport, accommodation, or daily activities. This sequence builds a workable itinerary in roughly 30 minutes because every subsequent decision filters through those three priorities.
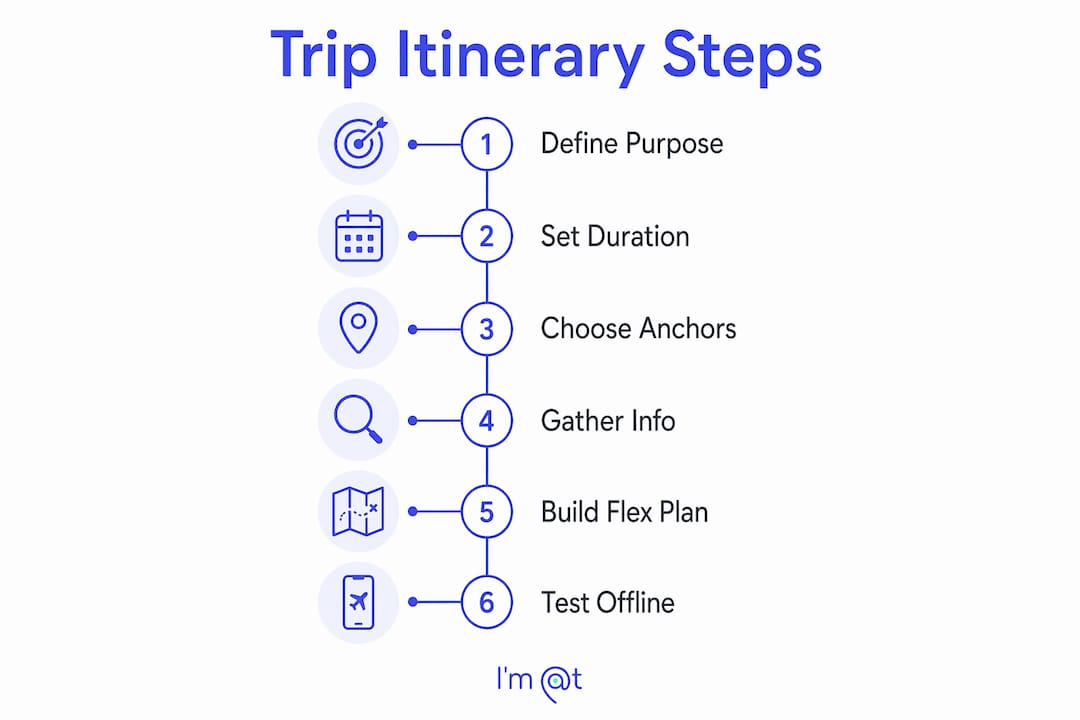
Once your anchors are set, lock in flights, accommodation, and any pre-booked activities first. These are your fixed points. Everything else sits in two tiers: preferred activities you want to do, and a backup list of three to five alternatives per destination. The fixed anchors plus tiered preferences method keeps your plan adaptable when real-time conditions change, which they always do.
This three-layer structure is what separates a realistic itinerary from an optimistic one. Travelers who skip the backup tier spend the most time stressed on the ground, renegotiating their entire day because one venue was closed or overbooked. Build the backup list before you leave, not while you're standing on a street corner.
How to gather and centralize all your trip information
The most common source of travel confusion is scattered information: a hotel confirmation in one email, a tour booking in another, and a restaurant reservation in a notes app. The fix is a trip-specific digital folder with a clear hierarchy built before you leave home.
A practical folder structure looks like this:
- Flights: Confirmation numbers, boarding passes, terminal details, and airline contact numbers
- Accommodation: Check-in times, addresses, Wi-Fi passwords, and cancellation policies
- Transport: Train tickets, car rental agreements, ferry bookings, and local transit maps
- Activities: Tour confirmations, ticket PDFs, venue addresses, and opening hours
- Documents: Passport scan, visa approvals, travel insurance policy, and emergency contacts
Beyond the folder, build a single master itinerary document that pulls the key details from each category into one chronological view. A master itinerary file with updated booking confirmations, dates, locations, and costs prevents detail loss and supports quick retrieval when you need it most.
Pro Tip: Test your entire folder in airplane mode before you travel. If a PDF won't open offline, download it for offline access now. Connectivity at airports, border crossings, and rural destinations is never guaranteed.

The offline test is the single most overlooked step in pre-trip preparation. Most travelers assume their documents are accessible until they're standing at a check-in desk with no signal.
What is the best framework for building flexible daily plans?
Daily itinerary structure works best when it is built around anchor points rather than strict timestamps. Planning around anchor points rather than specific time slots allows your schedule to absorb delays and still leave room for spontaneous discoveries. A morning anchor might be a museum visit; an afternoon anchor might be a neighborhood market. What happens between them stays flexible.
The geographic clustering principle is equally critical. Group activities by neighborhood rather than by theme or interest category. Visiting a gallery, a café, and a bookshop in the same district takes 20 minutes of transit. Visiting them across three different parts of a city can consume two hours. Geographic clustering cuts commute time by 30 to 50 percent and conserves energy for the experiences themselves.
Here is a practical daily structure that works for most leisure and adventure travelers:
- Define your morning anchor. One major activity, pre-booked if time-sensitive, in a specific neighborhood.
- Add one or two preferred activities nearby. These are not locked in. They are your first-choice options in that zone.
- Insert a 30 to 60 minute buffer block. Place it between your morning and afternoon anchors. This absorbs delays without collapsing your day.
- Set your afternoon anchor. One activity, ideally in the same or adjacent neighborhood.
- Leave the evening open or lightly planned. Dinner reservations are worth booking; everything else should stay flexible.
- Attach two backup options to each anchor. If the first choice falls through, you already know what comes next.
Pro Tip: Limit yourself to two or three major activities per day. Travelers who schedule five or six consistently report feeling exhausted rather than enriched. Pacing is a planning decision, not a personality trait.
The table below shows how to balance activity load across a typical travel day:
| Time block | Activity type | Flexibility level |
|---|---|---|
| Morning (2-3 hrs) | Anchor activity, pre-booked | Fixed |
| Midday (30-60 min) | Buffer or casual meal | Fully flexible |
| Afternoon (2-3 hrs) | Preferred activity, same zone | Adjustable |
| Evening (1-2 hrs) | Dinner reservation or rest | Lightly planned |
| Backup list | 2-3 alternatives per zone | On-demand |
What tools and templates work best for itinerary planning?
The right tool depends on how you think and how you travel. For most leisure travelers, a combination of two or three tools covers every need without creating a management burden.
Google Maps is the most underused itinerary tool available. Create a custom map or saved list for each destination, drop pins for every venue, and group them by neighborhood. This gives you a visual confirmation that your geographic clustering actually works before you arrive. You can share the map with travel companions instantly.
TripIt aggregates booking confirmations automatically when you forward confirmation emails to the app. It builds a master timeline from your flights, hotels, and activities without manual data entry. For travelers managing complex multi-city trips, TripIt removes the risk of overlooking a connection or a check-in window.
For travelers who prefer full control, a spreadsheet with the following columns covers everything:
- Date and day number
- Location and neighborhood
- Activity name and booking status
- Confirmation number or link
- Opening hours and address
- Estimated cost
- Backup option
The travel planning tools that save the most time are the ones you actually use consistently, not the most feature-rich ones. A Google Sheet shared with your travel group beats a sophisticated app that only one person checks.
For group travel, shared documents and collaborative tools matter more than solo itinerary apps. A shared Google Doc or Notion page lets every member of the group see updates in real time, add preferences, and flag conflicts before departure. Group trips benefit from a designated itinerary owner who makes final calls, reducing the decision paralysis that derails group plans on the ground. For more on coordinating group experiences, the group boat tours guide from Affordable Crab Island Tours offers a practical breakdown of how to balance structured group time with individual flexibility.
How to validate and adapt your itinerary before and during travel
Building a plan is not the same as validating it. A realistic travel itinerary checklist includes a validation pass that checks every element against actual conditions.
Run through these checks at least 48 hours before departure:
- Opening hours: Confirm every venue is open on the specific day you plan to visit. Museums close on Mondays. Markets run only on weekends. These details change seasonally.
- Booking windows: Some popular attractions require advance booking weeks out. Validate that your preferred slots are still available.
- Transit times: Map the actual route between each activity, not just the distance. A two-kilometer walk in a hilly city takes 30 minutes, not 10.
- Neighborhood clusters: Verify that your grouped activities are genuinely close. Validate venue locations against actual maps, not just category assumptions.
- Backup list currency: Check that your backup options are still operating and accessible.
Pro Tip: Share your finalized itinerary with one person who is not traveling with you. A fresh set of eyes catches logical gaps, like a 7 a.m. activity scheduled after a midnight flight arrival, that you have stopped seeing after editing the same document for two weeks.
On the ground, treat your itinerary as a living document. Update it when plans change, note what worked and what did not, and keep your backup list visible. The travelers who adapt fastest are the ones who planned for adaptation from the start.
Key takeaways
Organizing trip itineraries effectively requires three layers: fixed anchors, preferred activities, and swap-ready backups built around geographic zones and realistic daily pacing.
| Point | Details |
|---|---|
| Start with three anchors | Define trip purpose, length, and three must-dos before building any daily plan. |
| Centralize all documents | Use a digital folder hierarchy and test every file in airplane mode before departure. |
| Cluster by geography | Group activities by neighborhood to cut transit time by 30 to 50 percent. |
| Build in buffer time | Add 30 to 60 minutes between activity blocks to absorb delays without losing the day. |
| Validate before you go | Check opening hours, transit times, and booking windows at least 48 hours before travel. |
Why I stopped over-planning and started building itinerary systems
Most travel advice tells you to plan more. My experience says the opposite. The trips that went wrong for me were not the ones where I had too little planned. They were the ones where I had planned so tightly that a single delay cascaded into a ruined afternoon.
The shift that changed how I travel was treating the itinerary as a system rather than a schedule. A system has layers: the things that are locked, the things that are preferred, and the things that are ready to swap in. When I started building backup lists before every trip, I stopped feeling anxious about disruptions. The backup was already decided. I just executed it.
Geographic clustering was the other revelation. I used to plan by interest: all the art on one day, all the food on another. The problem was that my "food day" covered four different neighborhoods and I spent more time in transit than eating. Switching to zone-based planning felt counterintuitive at first, but it consistently produces better days.
The one thing I still see travelers resist is the offline test. Everyone assumes their documents are accessible until they are not. Testing in airplane mode takes three minutes and has saved me real stress at border crossings and remote airports. It is the simplest step with the highest return.
For anyone building their first structured itinerary, the smart activity planning guide on Im-at's blog is worth reading alongside this article. It covers daily activity optimization in more depth than most planning resources do.
— Mikahil
Ready to add pre-planned experiences to your itinerary?
One of the fastest ways to anchor a strong itinerary is to book one standout experience that structures the rest of your day around it. Im-at makes that easy.
If you are planning a trip to Cape Town, the 3-Day Cape Town Attraction tour covers the Township, Cape Peninsula, and Wine Tasting in a single organized package, giving you three ready-made daily anchors without the research burden. For something more unexpected, The Unholy Secrets is a curated experience that drops directly into an evening slot and gives any itinerary an edge. Browse Im-at's full catalog to find pre-planned experiences that fit your destination, travel dates, and activity style.
FAQ
What is the first step in organizing a trip itinerary?
Define your trip purpose, total length, and three must-do experiences before planning anything else. This framework filters every subsequent decision and produces a workable itinerary structure in roughly 30 minutes.
How many activities should I plan per day?
Two to three major activities per day is the practical limit for most travelers. Scheduling more consistently leads to exhaustion and rushed experiences rather than genuine enjoyment.
What is the best app for organizing travel itineraries?
TripIt is the most efficient option for travelers managing multi-city trips, as it auto-builds a timeline from forwarded booking confirmation emails. Google Maps custom lists work well for visual, zone-based activity grouping.
How do I keep my itinerary flexible without losing structure?
Use the three-layer method: lock your anchors, list your preferred activities, and prepare two to three backup options per destination. Add 30 to 60 minute buffer blocks between activity segments to absorb delays without collapsing the day.
Why should I test my travel documents in airplane mode?
Offline testing confirms that your passport scans, boarding passes, and booking confirmations are actually accessible without internet connectivity. Connectivity at airports, border crossings, and remote locations is unreliable, and discovering a document is not downloadable while standing at check-in is a preventable problem.